How to assign a ticket?
0 recommendations | 881 viewsAll incoming tickets can be categorized, prioritized, and assigned in no time. With TxHelpdesk, you can easily and accurately assign incoming tickets to the right person, you can automate the entire process, saving time and minimizing the possibility of manual errors.
Assigning tickets can be done either manually or automatically by adding a Smart Rule.
1 Manually Assign ticket
a. Assign tickets from the ticket listing page: A user can take ownership of any ticket, click on ![]() Take (Assign to me) icon on the ticket listing page. You can also assign the ticket to another user, click on the icon
Take (Assign to me) icon on the ticket listing page. You can also assign the ticket to another user, click on the icon ![]() Assign to
Assign to
Bulk actions can also be performed, the user has to select the tickets by just checking the box. Once the tickets are selected, the below icons will be displayed at the top.
![]()
Click on the Assign icon, the user will get a confirmation box whether you want to perform the action or not, Select YES if the user wants to perform the update.
b. Assign tickets from Ticket Details Page: User can select a different user from the drop-down menu and assign, Click tick sign once the user is selected. See screenshot below:

2. Auto-assign via SmartRule:
Provide the basic details of the rule and select when the rule must be executed; while the form is created, edited, or submitted.
To Add a Smart Rule, follow the steps below:
Click on![]() the Smart Rule icon in the left sidebar of the TxHelpdesk ticket listing page.
the Smart Rule icon in the left sidebar of the TxHelpdesk ticket listing page.
Add a new rule - click on the icon ![]() in the top right corner of the Smart Rule listing page.
in the top right corner of the Smart Rule listing page.
Description of the SmartRule form fields are given below:
Rule Name: The name you would like to give for the SmartRule.
Active: Toggle to activate or deactivate Smart Rule
One Time Execution: One-time execution can be set be on tickets, So it executes the rule only once when the criteria match. Toggle to activate or deactivate Smart Rule
Clauses:: Clause defines the conditions or rules. On what condition do you want to activate this Smart Rule.
1. Match ALL of these conditions: – All aspects of the Rule must be satisfied in order to take the action(s).
Select the Attributes with the help of the dropdown menu.. You can add the attributes by click on the icon ![]() , also can delete the same by click on the delete icon
, also can delete the same by click on the delete icon ![]()
2..Match ANY of these conditions – Only one aspect of the Rule must be satisfied in order to take the action(s).
Select the Attributes with the help of the dropdown menu. You can add the attributes by click on the icon ![]() , also can delete the same by click on delete icon
, also can delete the same by click on delete icon ![]()
Queues: Queues on which this Smart Rule is activated. Click on the Select All button. all the queues will be displayed. Remove the queue where the rule need not be executed, just click on the cross to remove.
Action: Action to be taken if conditions are matched.
Actions list page
Select the Action with the help of the dropdown menu and set the values. You can add the Action by a click on the icon ![]() , also can delete the same by click on the delete icon
, also can delete the same by click on the delete icon ![]()
Fields marked with * are mandatory
3. Click on ‘Submit’ to add the Smart Rule.
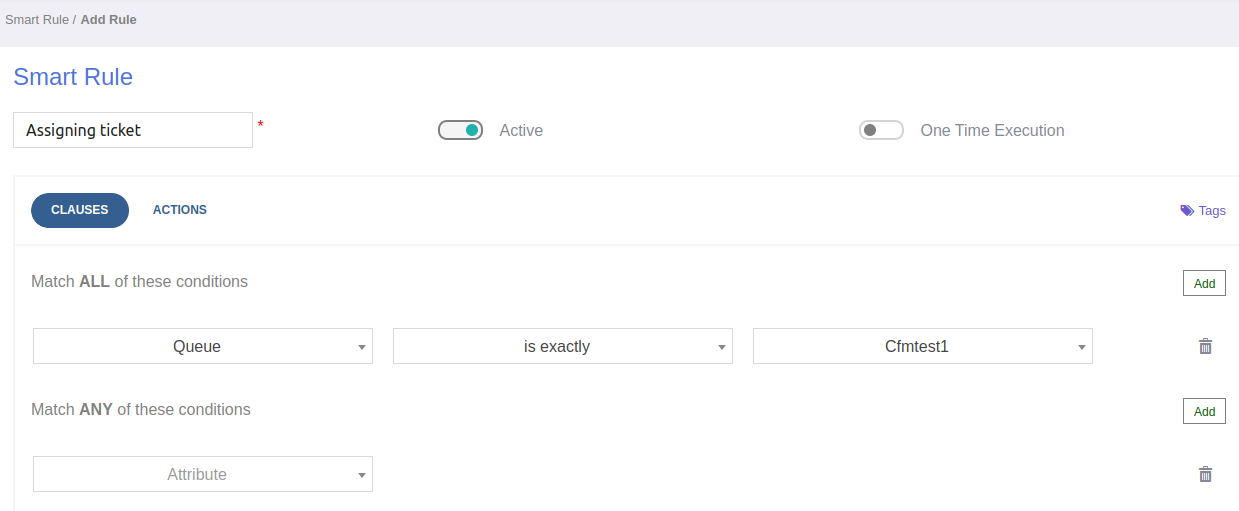
Please refer to the image below as an example to assign tickets via Smart Rule
In the below image Smart Rule has been set to automatically assign the ticket to the User -Chethan, if the ticket is from the queue - Cfmtest1
.
