Knowledge Base
How to create a campaign in Txdialer?
0 recommendations | 852 views
Go to TxDialer -> Campaigns
Click on the new button at the top right end of the page.
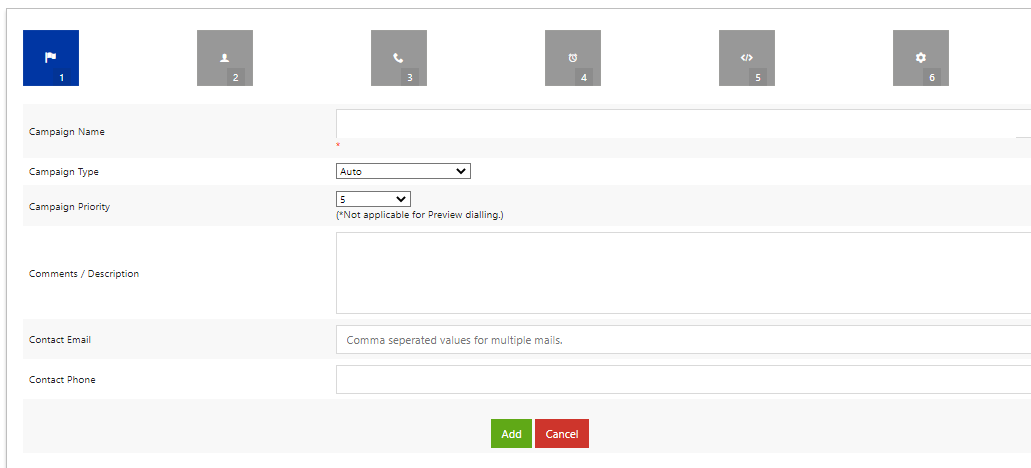
Once the user clicks the New button, the page will redirect user to the Wizard (New Campaigns) page as shown in the image below.

Click on ‘add’ button to create a new campaign.
Once the campaign is created, the campaign will be show in the Campaign listing page.

Click on the campaign name, the page will redirect user to the Campaign Settings page.

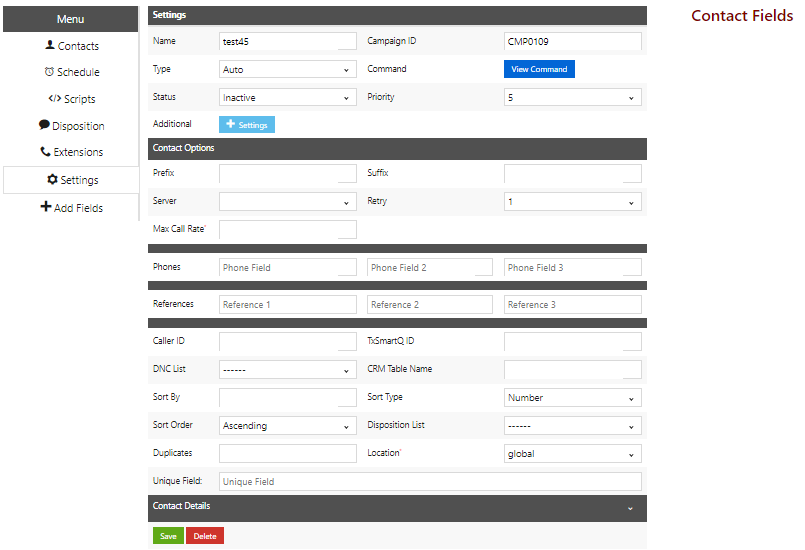
Campaign Settings The Settings page lets the user edit campaign configuration values such as dial options, contact details etc.
● Name : Name of the campaign.
● Campaign ID : Auto generated unique ID for campaign
● Type : The dialer is set up to function in various modes namely - Auto, Preview, Progressive, Predictive and Manual. One can select the type of the dialing mode here.
● Status : Indicates whether the campaign is active or inactive
● Timezone : It is the timezone in which campaign schedule is set.
● Priority : This sets the priority of the campaigns.
● Dial Prefix and Suffix : It is the configuration required for making calls as required by the gateway.
● Call Server : The PBX(call servers) IP address that can be used to make calls or auto dialing campaign.
● Retry : The number of times the contact should be dialed, if the call fails when dialed first.
Click on Save button to save the details.
Note : Select the type of the Campaign as Auto
Click on the
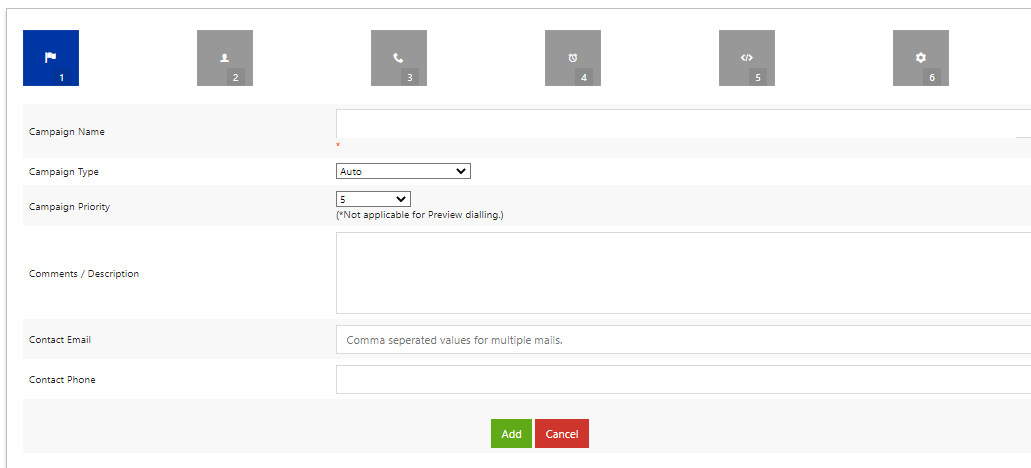
Once the user clicks the New button, the page will redirect user to the Wizard (New Campaigns) page as shown in the image below.

Click on ‘add’ button to create a new campaign.
Once the campaign is created, the campaign will be show in the Campaign listing page.

Click on the campaign name, the page will redirect user to the Campaign Settings page.

Campaign Settings The Settings page lets the user edit campaign configuration values such as dial options, contact details etc.
● Name : Name of the campaign.
● Campaign ID : Auto generated unique ID for campaign
● Type : The dialer is set up to function in various modes namely - Auto, Preview, Progressive, Predictive and Manual. One can select the type of the dialing mode here.
● Status : Indicates whether the campaign is active or inactive
● Timezone : It is the timezone in which campaign schedule is set.
● Priority : This sets the priority of the campaigns.
● Dial Prefix and Suffix : It is the configuration required for making calls as required by the gateway.
● Call Server : The PBX(call servers) IP address that can be used to make calls or auto dialing campaign.
● Retry : The number of times the contact should be dialed, if the call fails when dialed first.
Click on Save button to save the details.
Note : Select the type of the Campaign as Auto
Did you find it helpful?