TxHelpdesk

  • Login
  • Submit a Ticket
  • Knowledge Base
© 2025 TxHelpdesk
Knowledge Base
  • Knowledge Base
  • TxDialer
  • How to Configure Screenp…
How to Configure Screenpop for a New Campaign in KBL
0 recommendations  | 42 views

Step 1: Add a New Disposition in Dialer

  • Login to the Dialer.

  • Navigate to Disposition and click on Add New Disposition.
    https://txcontact.kblservices.in/txdialer/edit/?

  • Once the disposition is created, link it to a specific campaign:
     - Go to the desired campaign.
     - Select the newly created disposition list in the campaign configuration.
     - Copy the Campaign ID for later use.

Step 2: Configure Screenpop in SmartQ

  • Go to Screenpop Configuration
    https://txcontact.kblservices.in/txsmartq/provisioning/screenpop/add/

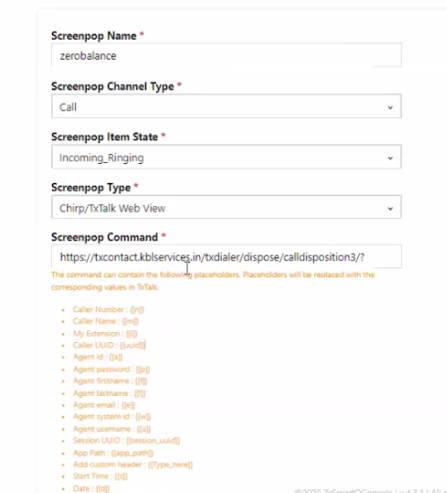
  • Click on Add to create a new screenpop (Refer to the screenshot for reference).


  • Under Screenpop Command, add the following:

    https://txcontact.kblservices.in/txdialer/dispose/calldisposition3/?Time={{st}}&tenant_id=kbl&agent_id={{a}}&customer_number={{n}}&cmp_id={{X-campaign_id}}&call_id={{X-call_id}}&fetch=all&disp_listname=ZeroBalance&session_uuid={{session_uuid}}&contact_id={{X-contact_id}}&make_call=*81
     
  • Replace the disp_listname (ZeroBalance) with the newly created disposition list.
  •  
  • Under Screenpop Condition, add the following:

    '{{X-campaign_id}}' == "NEW_CAMPAIGN_ID"
  •  
  • Replace NEW_CAMPAIGN_ID with the campaign ID copied from Step 1.

Step 3: Update Default Screenpop for All Campaign

  • Open the existing default screenpop configuration:

    https://txcontact.kblservices.in/txsmartq/provisioning/screenpop/update/?screenpop_id=a3576d6c-85e8-11ed-af18-70e28427c4ec

  • The current Screenpop Command looks like this:

    "{{X-campaign_id}}"!="CMP0005" && "{{X-campaign_id}}"!="CMP0085" && "{{X-campaign_id}}"!="CMP0008" &&
    "{{X-campaign_id}}"!="CMP0082" && "{{X-campaign_id}}"!="CMP0089" && "{{X-campaign_id}}"!="CMP0088" &&
    "{{X-campaign_id}}"!="CMP0092" && "{{X-campaign_id}}"!="CMP0091" && "{{X-campaign_id}}"!="CMP0093" &&
    "{{X-campaign_id}}"!="CMP0095"
  •  
  • Include the newly added campaign ID in the above condition:

    && "{{X-campaign_id}}"!="NEW_CAMPAIGN_ID"
  •  
  • After saving both configurations:

    • The new campaign will have its own screenpop defined.

    • The default screenpop will exclude it from triggering.
       

Step 4 : Go to Administration >> Provisioning >> Prov Settings

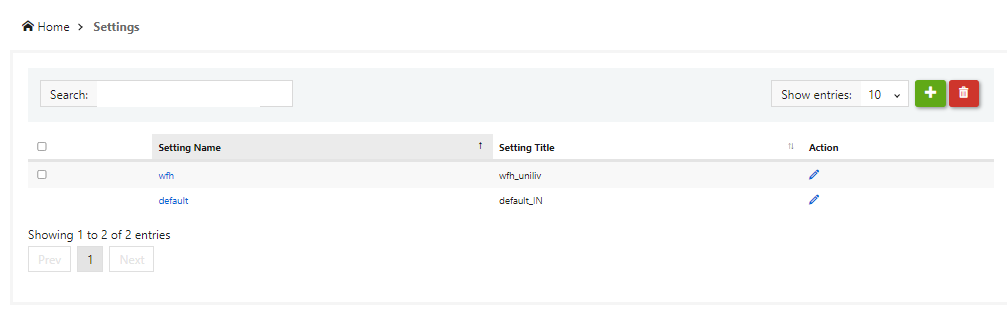
  •  Click on the Setting Name.
  • Once user clicks on setting name it will redirect to the Provisioning Settings page.

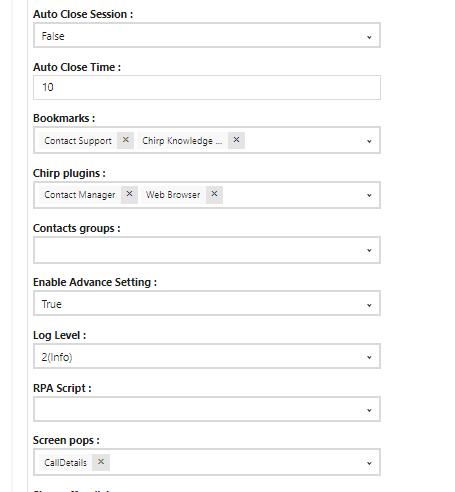
  • Under the Screen POPs option select the  created screen pop up.
  • Click on Update button .
Did you find it helpful?
Share
Other TxDialer Articles
  • How to add contacts to the DNC registry?
  • What are the different modes of Dialling?
  • How to achieve auto rechurn?
  • How to improve connect rates / productivity ?
  • How to fix when CRM disposition fails?
Categories
  • C - Tools
  • Chirp
  • CRM Integrations
  • General
  • Headset troubleshooting
  • TxChat
  • TxContact App
  • TxDialer
  • TxHelpdesk
  • TxRecord
  • TxReport
  • TxScreenCapture
  • TxSmartQ
  • TxTalk
  • TxTalk Web
  • User Manual